AB Tasty
AB Tasty is another A/B Testing tool, and this documentation is about how to create an A/B Test campaign on AB Tasty tool, and with that the documentation also provides info about how to operate these A/B tests, how to maintain them time to time, how to rework on them, best practices etc.
Initial step
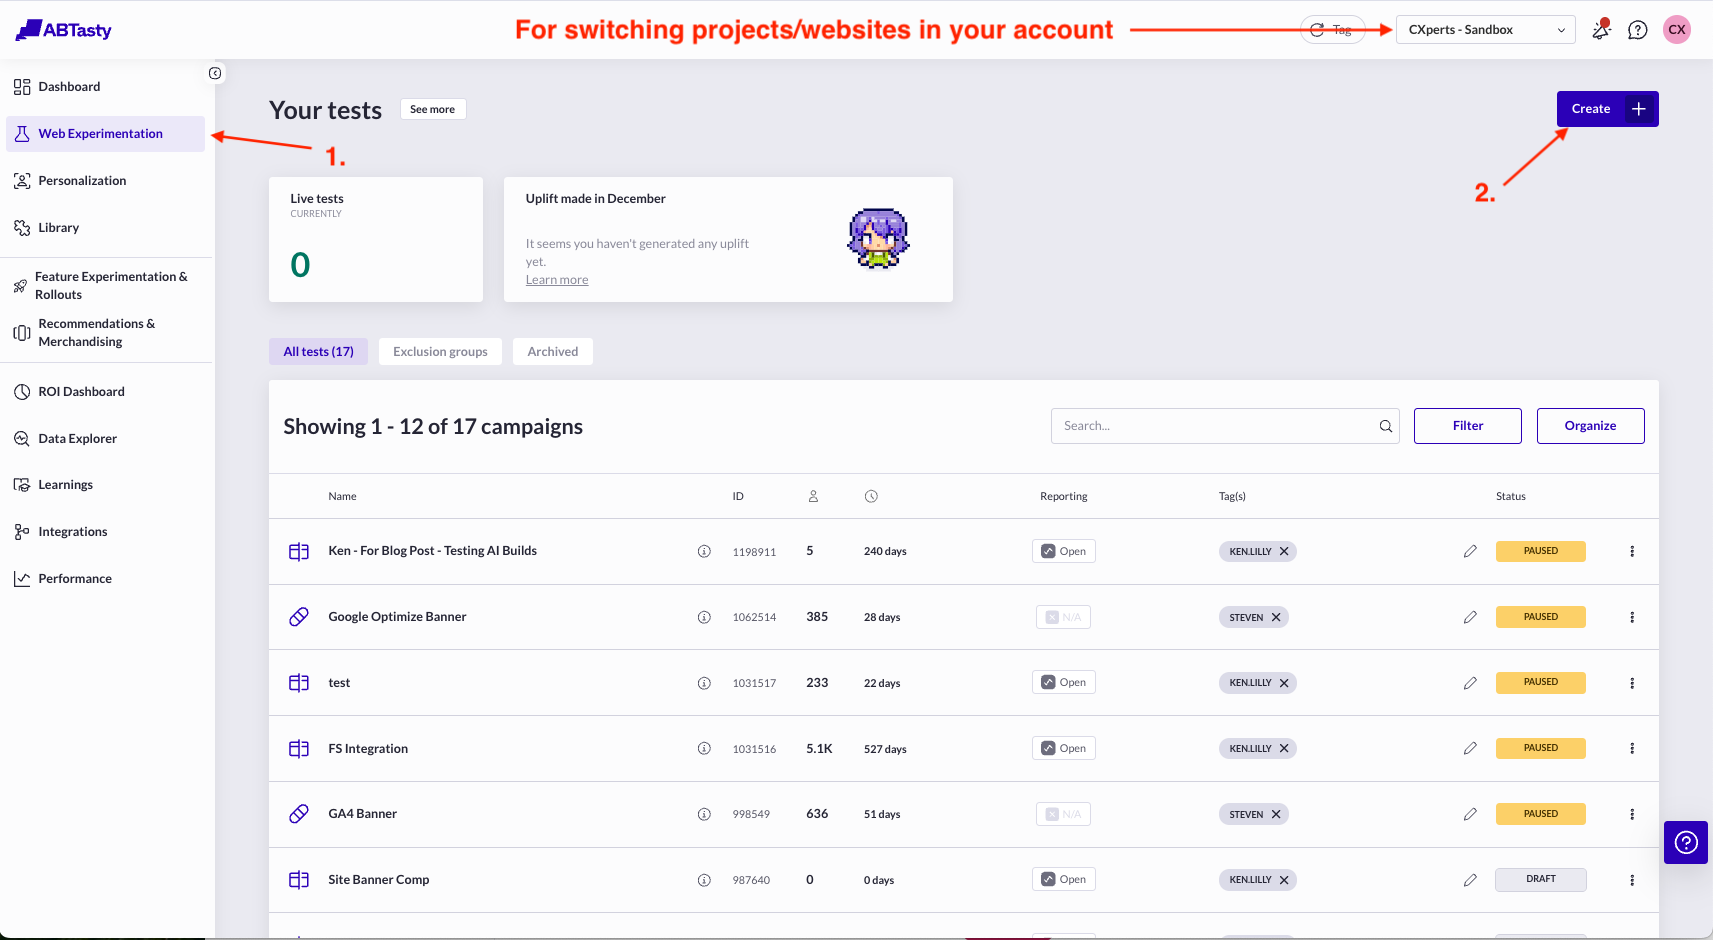
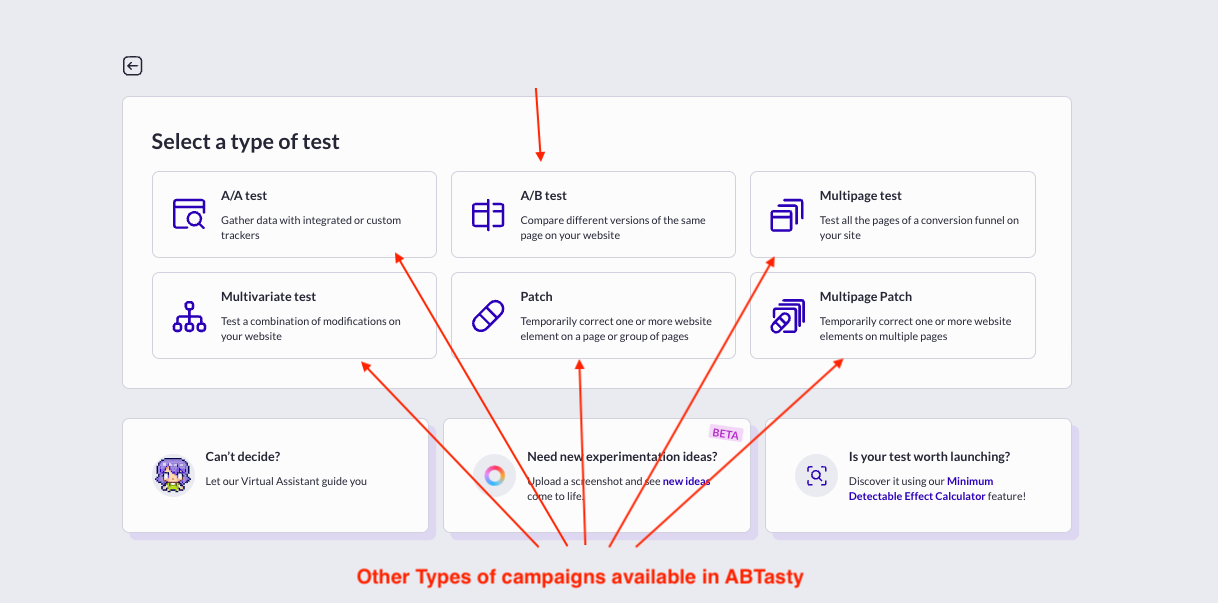
- To create an A/B test, go to Web Experimentation, click the Create button, which should then provide you option to choose what type of campaign you want to create. Here you can see what all other types of campaign can be created in ABTasty and some brief info about what they are and how they are different from an A/B Test.
- After selecting A/B Test type of campaign, you reach Test setup menu. Here on the left you have all the steps in sequence you go through of setting up and maintaining a campaign
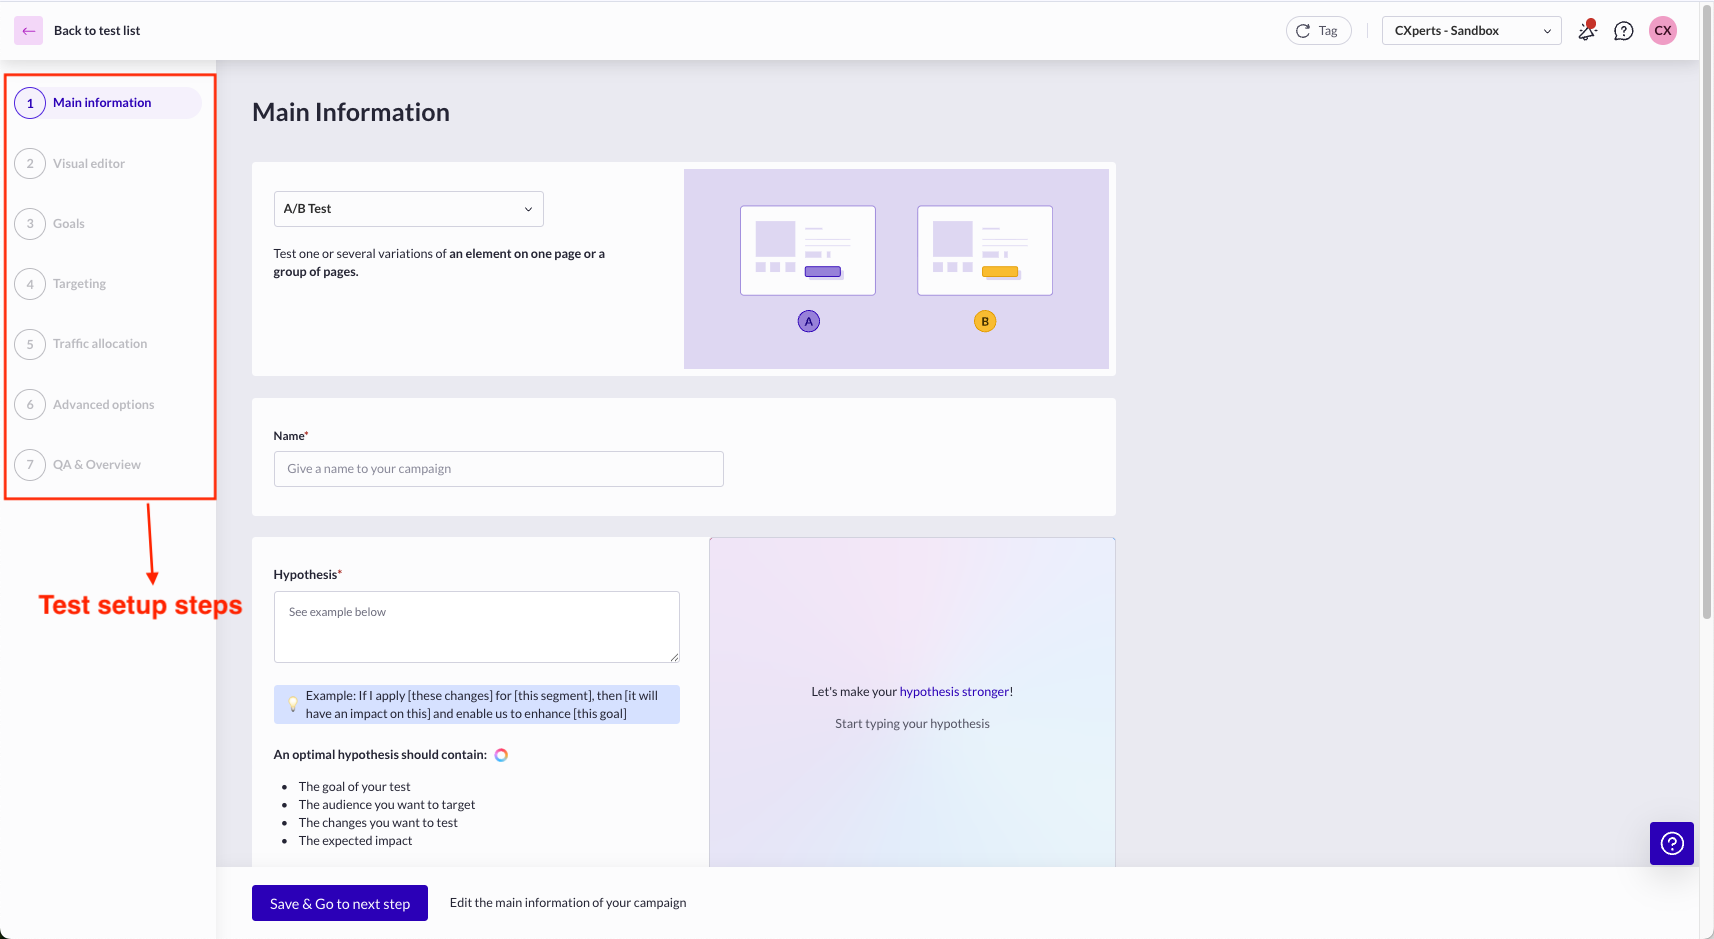
Before going through every step of setup, you can go through this article, providing brief info about all the steps.
Campaign Menu
This whole dashboard is there for working with an A/B Test campaign, it has multiple pages shown in a sequence.
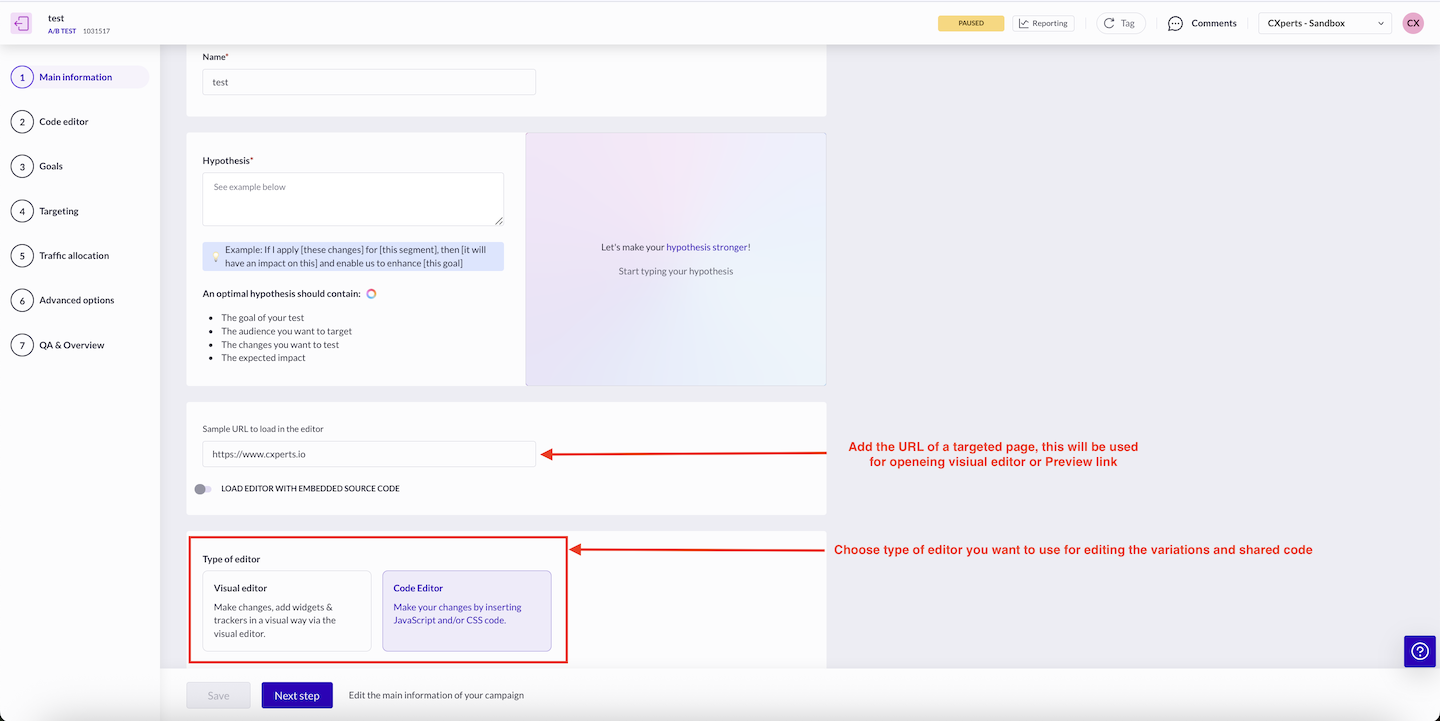
1. Main Information
Here you provide info like
- Test name
- Test hypothesis
- Providing sample url of a targeted page
- Choose whether to edit the variations in visual or code editor
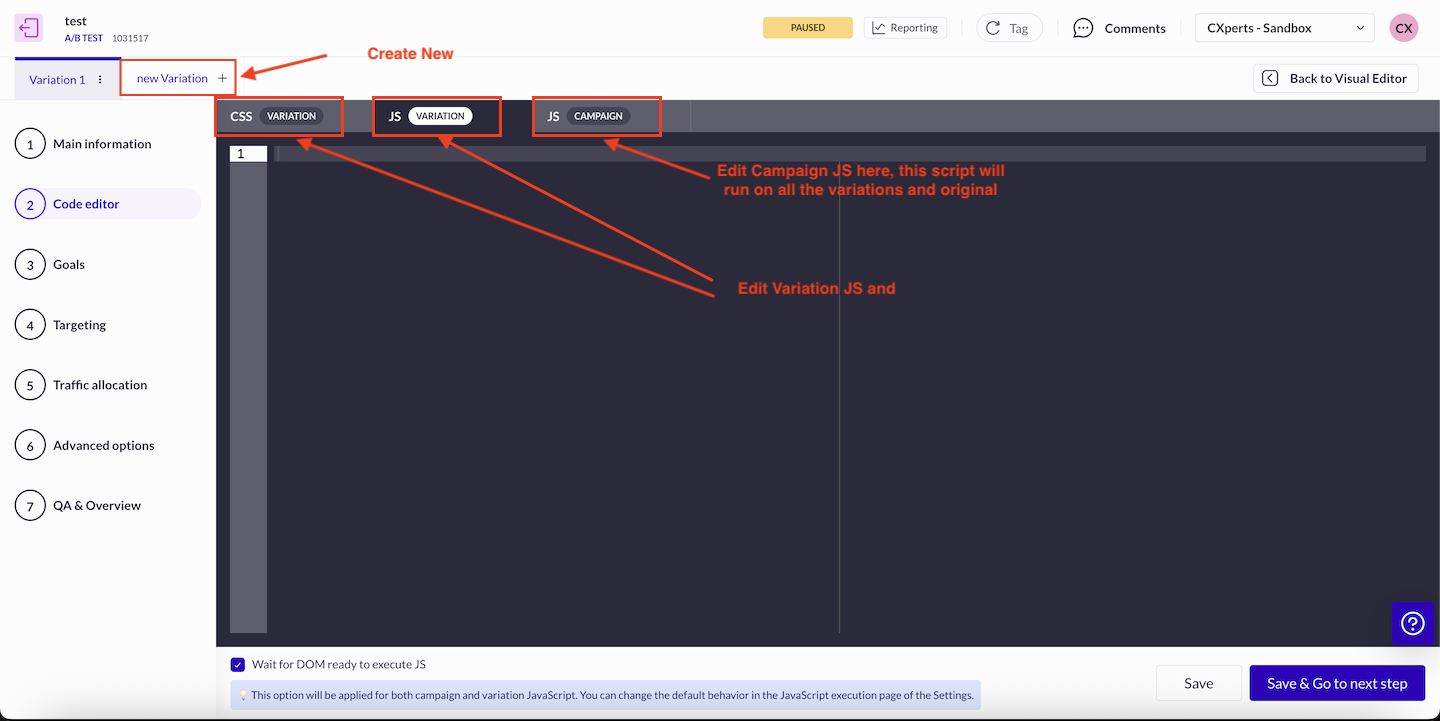
2. Variation Editing
a. Code Editor
On this page you can edit your shared script(Script which runs on all the variations and original), Variation’s JS and CSS. In variation JS specifically it is a better practice to place a console at the first line, logging just the test ID and Variation name and then you can place your variation script, which can be bundled or non-bundled.
console.log('#### Test - 1, Variation 1 ####');

// Your Variation Script below
Here you can know more about Code Editor
b. Visual Editor
We mostly use this feature only for adding Action Trackers. Usage of this feature is explained further in this documentation
3. Goals
This page provides option to manage different types of trackers for your campaign. This tool categorize trackers into 5 different types. For more info visit this link
- Action Trackers
- Page Tracker
- Custom Tracker It is recommended that for basic click tracking, try to use Action Trackers, and use these trackers only for specific requirements.
- Browsing Metrics
- Transactions
4. Targeting
In this section, tool provides option to setup/modify targeting settings of an A/B Test and other types of campaigns. This documentation provides you all the info about how to manage different aspects of targeting of a campaign. Some special points to be mentioned:
- Custom JS based Targeting: If you want to use your own js script for targeting, tool provides two places where the custom JS can be added, one is within Pages section of targeting setup, this code added will stick to the current test only. Another place to add JS script for targeting is withing a trigger. If your JS script will be used for targeting in other tests also, then it is recommended that you create a saperate trigger which will usbale in other campaign in the project. Here is the link to Custom JS documentation.
Best practices to be followed in targeting
- In ABTasty you do not need to create cookie segment or add any other specific condition in targeting for QA purposes, because that aspect is separately handled by ABTasty in QA & Overview section.
- When you are using JS based targeting some points need to be especially taken care of:
- As soon as you add a script in test or create a trigger, that script is now live on all the pages for all the users on the website, even if your test is in “draft” status or “in QA” right now. So this code should be efficient, should be free of any errors, memory leaks etc and should be as light as possible. Usage of timers should be done conservatively and efficiently.
- Any DOM manipulation is strictly not recommended from this targeting script even if that is helping in reducing flicker.
- In the initial phase when you have added the targeting code and QA’ing the test, it’s better to add a QA cookie check, in the targeting script.
- A regular clean-up of unused segments and triggers should be done to make the setup light, because if it is not done, the accumulation of these will start to affect website performance.
5. Traffic Allocation
Traffic diversion is usually used for following purposes:
- QA purpose: we divert all the traffic to the variation which we want to QA.
- When the test is to be made live, in that case usually traffic is diverted equally among all the variation including original. You also sometimes keep some traffic as untracked, which means that this traffic is not bucketed into any variation, nor bucketed into original, for testing.
- After a test is concluded, and a variation has been the winner producing signifincatly better results then other variations or original, in that case we divert all the traffic to the winning variation and keep the test live. But this is not a good practice. After you have a variation as a winner. Test needs to be stopped and variation needs to be implemented in the website’s source code, so that we can have space to run new test, because after a certain number of simultanous live tests performance of your website and you testing setup start getting affected.
This Documentation will help you setup traffic allocation.
6. Advanced
Link to advanced setup doc.
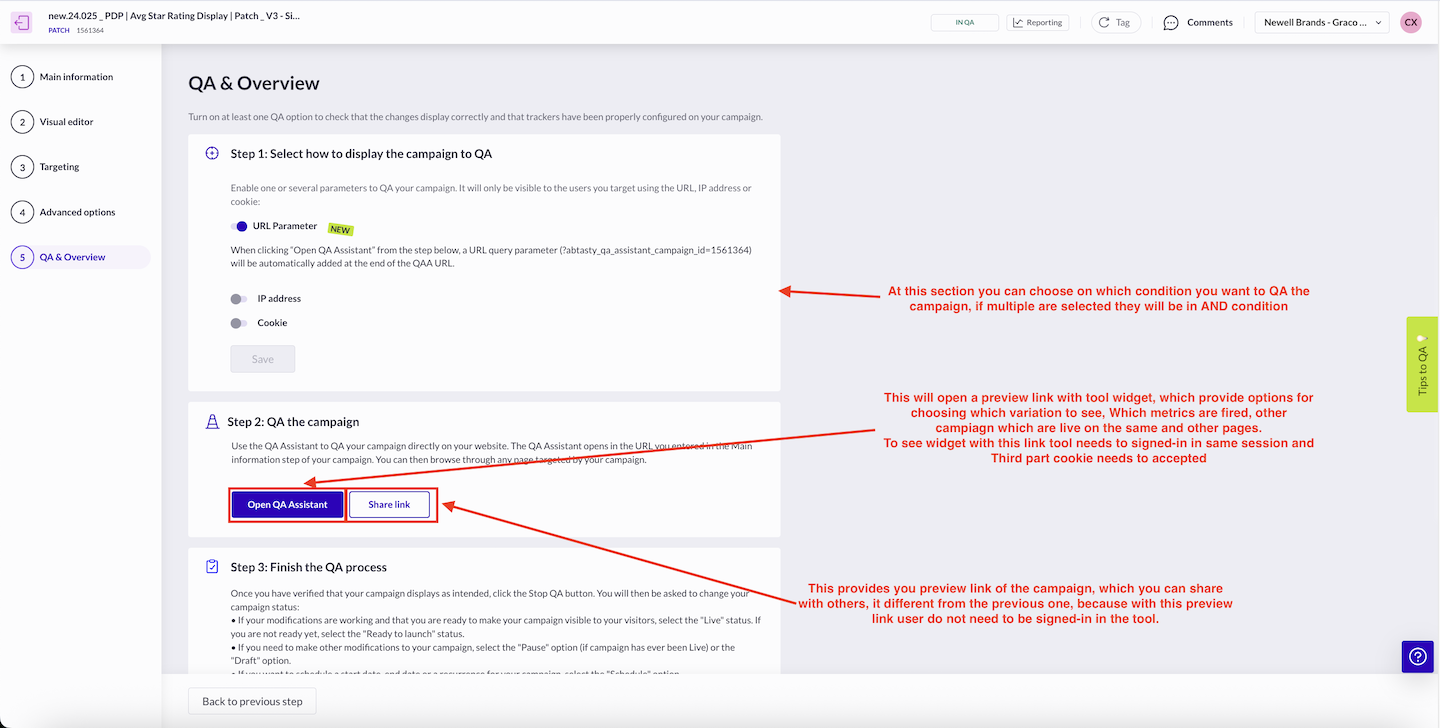
7. QA & Overview
ABTasty tool provides separate step for QA’ing, at this step you can choose three different types of conditions, which can help you QA it, mostly used is cookie condition. Documentation
At this step there is also a option provided to open the preview link in same session, this PL would require tool being signed in, for a shareable link tool provides option at this same step.
In ABTasty update of metrics data for a campaign takes very long time, so a sharable PL can also be used for QA’ing Trackers.